Saturday, January 29, 2011

Introducing...

My two new sewing machines!!!


Welcome Singer 1! I got a great deal on it at our local thrift store on Tuesday. It's not one I would have chosen had I been choosing a new one, but I'm thankful for this nice, affordable machine the Lord gave me. I've been running it, and, though it has a few minor issues and just needs a general tune-up, it's a great machine, and a fantastic answer to prayer. It's just a little older than Mommy's machine, which has previously been our only machine and the one I'd been using for everything. It is a workhorse of a machine, but I'm hoping it will serve me well for many years to come! As a bonus, it even came with it's white singer case and a spool of thread and threaded bobbin. (And yes, if you'd like to know something new about me, I do name my machines and this one is yet unnamed...)


A view from the top


And, welcome Singer 2! Yes, there is a story behind the purchase of this machine. I found it tucked away in the back corner of our quaint little thrift store, with a pile of other things on top and couldn't find a price. As I love old machines, I found a couple employees there who brought it out and find the price sticker for $75. The lady very kindly offered it to me for $25 and I accepted. Upon opening it, we discovered there was no cord and foot pedal - that was a big disappointment as I couldn't pay that price without knowing that it runs well. The man went to the back to see if he could find the cord; he couldn't find it, but brought back Singer 1 and offered me this one for $10 - a good price for the table.
And the conclusion? I've done some research on this machine and ordered a cord and foot pedal which should arrive early next week. From there I'll determine what to do with it. If it doesn't work, I may just hold onto it for now or let my little brothers take it apart. If it does work, I'll determine whether it's worth refurbishing. I've already found a bunch of the main parts for it on the website I ordered the power cord from. Needless to say, I'm very excited. I love vintage machines and would be delighted to have this one in working condition. It wouldn't be my main workhorse, but would be a great backup machine and a much-needed accessory for the sewing class I'll be teaching soon.
Once I get the cord, I'll update!


Even if for nothing else, the table is beautiful! You can't see it in this picture, but it has a larger leaf that opens up to the left, and a cute, functional accessory drawer to the left of the machine. I'm looking into putting Singer 1 into this table if this machine doesn't run.

Wednesday, January 26, 2011

Recent Alterations Project

Mommy found these pretty white skirts at Goodwill on our most recent visit. The top one is my favorite, but they're both very pretty, and, best of all, they both had nearly-matching eyelet-styled trim.


The first one-my favorite. It's hard to tell in this picture, but the upper large panel has a delicate white flower embroidery.


A close-up of the trim on this skirt


This is the second one, very pretty also


A close-up of the trim on the second skirt

The skirts both measured an equal distance around the hem. An hour last Saturday afternoon with our sewing machine and a pair of scissors, produced this:


Pretty...and it added an extra couple inches to the length too.


A close-up of the added panel. I stitched it on over the stitching lines that were already trimming the hem so I wouldn't be adding extra seams. Now I can't wait for spring! :)


Recently, a neighbor, in cleaning out, gave me a bunch of her crafting supplies, including these lovely fabrics.
The plaid is a flannel, and the red and light brown feel like a very light velvet or suede. It's hard to tell exactly, but they're beautiful fabrics, and I think I have some new winter skirts for myself planned with these.

I made a couple very exciting acquisitions at our local thrift store yesterday. They are an answer to a prayer of mine for many months now. And not only did I get one of these, but two!!! God is truly SO good!!!
Curious yet? You're welcome to give me your guesses in the comments, and I will write the official post, with pictures, later this week! :)

Monday, January 24, 2011

A New Venture into the World of Models


If you've been reading this blog long, you're probably aware that I've begun crocheting infant hats for my etsy shop. With my new light box, I've been able to achieve a measure of acceptable photography, but even so, there's a point at which infant accessories look best on a model.

Hence, I've joined Ellie Bean Models as a Boutique Partner. Just go to 'Boutique Partners' and use the arrow to scroll down to my shop in the 'C' section.
The way it works is very simple. As a boutique partner, I can pick a model off their site and they'll send an assignment email to the parent. When the parent accepts, I mail the item, which the model keeps, and they, in return, send professional pictures with a release for me to use them in my shop.
I'm very excited about this opportunity. In fact, I have my first hat ready to mail off tomorrow for pictures!

And not only is it the first hat ready to model, but it's the first of a new crocheting pattern I've been designing. Stay tuned for more news regarding my first pattern as I prepare it these next few weeks to sell on Etsy!

Monday, January 17, 2011

Featured in Etsy Treasuries!

Recently, I put up this cute baby beanie listing in my shop. In the two days it's been up, it has been featured in two treasuries.

For those of you who are not so familiar with Etsy, a treasury is  is a compilation of listings from a variety of shops chosen around any theme you wish. For example, around Valentine's Day, people will make treasuries with hearts, pink, or red, and around Christmas, there will be red and green, or tree themed treasuries.
Basically, one of the greatest benefits of treasuries is an increased shop exposure for those whose items are featured in it.
You can view the treasury lists, even if you don't have an Etsy account:

You Were Born to Be My Baby

Happy Go Lucky

And for my new little shop, I have to admit I'm loving the increased exposure! There is a big market for baby photo props, and handmade baby gifts, but there's also a lot of competition in that market as well, and becoming prominent in the Etsy searches and getting the word around is one of my best ways of marketing.

Thursday, January 13, 2011

Making a Light Box

For some time, I've been wanting a light box for taking photos, especially for the shop. But buying one is prohibitively expensive and I just hadn't considered trying to make my own...that is, until I read this wonderful post this morning from another crafter's blog I read. I was inspired to try it, and spent about half an hour this morning on my light box. Several family members cast dubious looks at my creation, and I admit I had my doubts too, but I'm extremely pleased with how it works. Let's take a look!


I rescued a box off the back porch to turn into my light box. Yes, after four years in this house, we're still unpacking boxes, and this one happened to get squashed and became destined for the trash.


Here is my finished light box. The lamp is my brother's "discarded" airplane lamp from his desk. It works, right?! :)

In spite of the fuss with lighting an the macro setting that my older camera made, I was still pleased with how it did. Here are a couple of the best examples to show you how well my light box came out! I haven't edited them on picnik...

~My little trinket chest I received years ago for my birthday from our adopted grandparents~

 ~One of my favorite pieces of jewelry. A friend made the pendant and I bought the chain at a neighbor's yard sale~

Do be sure to check out the amazing blog post for the complete tutorial!

P.S. If you're wondering why this blog is going to be silent for the next few days, let's keep a long story short...while using the scissors to make the light box this morning, I cut a large gash in the top of my finger (I could, but won't post pictures of that), so I'm going to give my hand a break from typing for a few days. But I'll be back next week with pictures from my current sewing projects!

Wednesday, January 12, 2011

More Crocheting Projects

Yes, I have been doing some sewing lately, but as there's no pictures yet, I'll share some of my recent crocheting projects.


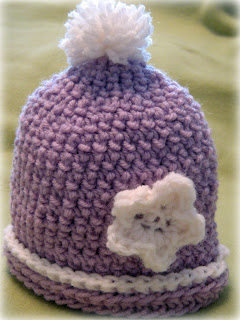
I made this one with this pattern in a newborn size for a friend's baby shower last week. My sister kindly made the cute pom-pom.


For this one, I just googled 'tiny crochet heart pattern' and came up with this pattern. I've bookmarked the page because some of her other projects looked interesting.


For these last two, I used a pattern I made myself on the spur of the moment. I love this versatile pattern. It's unisex and so easy to decorate different ways. I'm currently working on another one that is a partly wool blend with flecks of gold, red, blue, and green in the off-white yarn. I'll be adding matching pom-poms on braided strings.


This one was a fun experiment. I used this baby beanie pattern for the hat and trim. I added the flowers and chain vine to create a Hawaiian and tropical feel. This one was made out of cotton yarn.

The best part is that I made these last three hats for The Shoppe! Please do check them out and let me know what you think! I'm currently in the process of connecting with a number of professional photographers, so soon I'll be getting professional pictures of these. I'm also working on designing a couple different designs of infant hats which I'm not yet ready to disclose.


As a bonus, Tiger in his hat I made him, which I posted about here. This cutie is growing up so fast!

Saturday, January 8, 2011

Styrofoam Snowmen Ornaments

One of the little craft projects I completed recently was for my sister's birthday back in October - yes, and I'm only now getting around to posting this...

Among the bins of crafting supplies I purchased from our neighbor's yard sale for a song back in March was a little ziploc bag of Styrofoam balls. 'What am I going to do with these?' ...that was my first thought, but I stashed them away just in case...

My sister loves snowmen...and that's where the inspiration for these came from! Once I had the idea, the making of the snowmen was very simple.

Using tacky glue, I glued the balls together. Once those were dry, I glued on tiny black plastic seed beads for the eyes, mouth, and buttons, and colored the ends of toothpicks with an orange marker for the carrot noses. I made the hats, mittens and scarves in her favorite colors - orange, pink, and green. I drew out the mitten pattern freehand and used metallic cord for the arms, adding gold sequins for decoration. For two of the scarves, I used ribbon, and since I didn't have orange ribbon, I braided different shades of orange yarn for the third. I used embroidery floss for the hanging strings. Little ribbon rosettes from a headband project I did last year added a cute finishing touch.


And my sister loved them! Better yet...they're hanging in our downstairs windows right now! :)